
仕様/機能
UNiiQA+ NBase-Tモデルカメラの取込ライン数(Height)上限制限
内容
NBASE-T仕様には、カメラマニュアル「Height:1 to 16383」の
記載、上限の制限がございます。
カメラの突入電流値
内容
カメラ電源選択時の電源仕様
突入電流は余裕をもって2倍の電流値を見る
<例> カメラマニュアル記載数値(Typical Power Dissipation) Linea HS 8K : 18W → 推奨約36W Linea HS 16K : 30W → 推奨約60W
※カメラ本体の電源コネクタから電源供給のカメラが対象 (+12 VDC to +24 VDC)
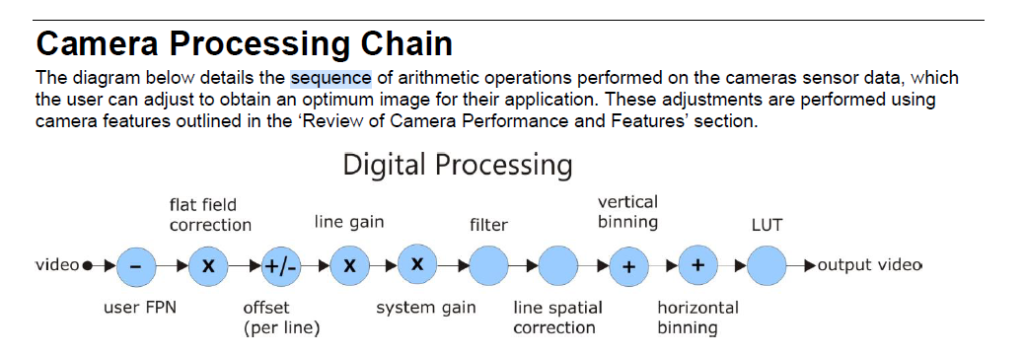
Black Level機能内容
内容
BlackLevel下図(添付)のOffsetの部分の制御になります。 ライン全体の出力を上げ、下げされることとなります。 下げることにより、黒レベルが早く黒くなります。 低いレベルのノイズを目立たなくする効果はありますが、 明かい部分が場合によっては飽和しない場合があります。
Black Level機能内容
上げることにより、早く飽和することとなります。 黒の部分が浮き上がるようになり全体的に浮ついた感じの画像となります。
値がデジタル的に変化のパラメータですので、 使い方によっては、見やすい画像を得ることが可能ですが、 間違えると欲する画像が得られなくなるので加減を注意しないといけません。
Falcon4-CLHS Series
_キャリブレーション手順
内容
Falcon 4-CLHS Series エリアスキャンカメラ
FPN Correction ModeとLens Shading Correction Modeの 両方で、Save Configurationの実施が必要です。
ダルサ社よりLens Shading Correctionの実施で、 PRNUと同じ補正を行うとの回答がありました。
動作確認カメラ:FA-HM11-M4485
CamExpert Category : Data Processing
- FPN Correction Mode→Calibration
- FPN Correction Active Set→User Set 1
- レンズに蓋をします(入光遮断)
- Calibration FPN→Press
- Save FPN Calibration→Press
- FPN Correction Mode→Active
- Camera Information→Power-up Configuration→Setting Camera Power-up Configration → User Set 1 Load/Save Configuration → User Set 1 → Save
Category : Lens Shading Correction ※Data Processing→Data Processingの「+」をクリック
- Lens Shading Correction Mode→Calibration
- Lens Shading Correction Active Set→Shading Coefficients 1
- Lens Shading Calibration→Press
- Save Calibration→Press
- Camera Information→Power-up Configuration→Setting Camera Power-up Configration → User Set 1
- Load/Save Configuration → User Set 1 → Save
EnhancementofInterest (EOIs) Regions Reduce ImageData&EnhancePerformance See the section Flat Field Category in Appendix A for GenICam features associated with this section and how to use them Related Features: enhancedImage, enhancedImageCount, enhancedImageSelector, enhancedImageStart, enhancedImageWidth, enhancedImageOffset and enhancedImageGain Enhancement of Interest (EOI) regions allow rapid gain and offset settings to be applied to up to 4 regions in the image. EOIs are supported in all imaging modes except for Super Resolution mode. The EOI feature has been optimized to load in minimum time (~ 50 ms) by only applying a gain and offset on a region rather than per-pixel. DN 255 Pixel Value EOI Start X Coordinate EOI Width 0 ImagePixel XCoordinate Figure 44: Enhancement of Interest EOI Offset &Gain Adjustment EOIs are designed for applications where maximum line rate is a priority and pixel flatness for the region is tolerable, as compared to HDR mode or regional flat field correction (FFC), which provide per pixel adjustments. For example, if image has regions that are highly reflective and other regions that are dark, the response in a region can be adjusted to flatten the output. HDR mode or regional FFC can compensate for this by applying a per-pixel based correction, providing the best result for a flat image. However, HDR limits the maximum line rate due to dual line acquisition and FFC requires greater than 2 seconds to load user set coefficients and cannot be used to adjust to changes in image regions in real-time. Alternatively, EOIs provide the maximum line rate but with a flattened image region.
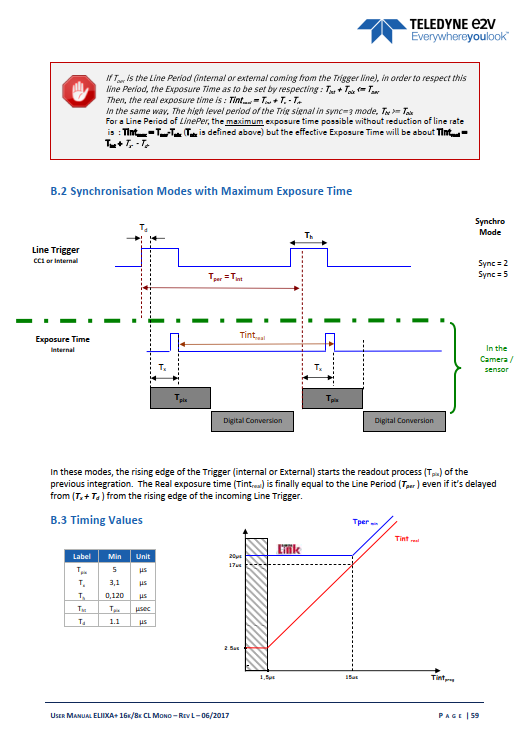
ELiiXA+ Exposure time
最大値
内容
Tint max = Tper-Tpix
設定可能な露光時間の最大値は、Line periodからタイミングピクセルを減じた値。
Timing pixelはreadout timeのこと
※Line periodはラインレートの逆数
EnhancementofInterest (EOIs) Regions Reduce ImageData&EnhancePerformance See the section Flat Field Category in Appendix A for GenICam features associated with this section and how to use them Related Features: enhancedImage, enhancedImageCount, enhancedImageSelector, enhancedImageStart, enhancedImageWidth, enhancedImageOffset and enhancedImageGain Enhancement of Interest (EOI) regions allow rapid gain and offset settings to be applied to up to 4 regions in the image. EOIs are supported in all imaging modes except for Super Resolution mode. The EOI feature has been optimized to load in minimum time (~ 50 ms) by only applying a gain and offset on a region rather than per-pixel. DN 255 Pixel Value EOI Start X Coordinate EOI Width 0 ImagePixel XCoordinate Figure 44: Enhancement of Interest EOI Offset &Gain Adjustment EOIs are designed for applications where maximum line rate is a priority and pixel flatness for the region is tolerable, as compared to HDR mode or regional flat field correction (FFC), which provide per pixel adjustments. For example, if image has regions that are highly reflective and other regions that are dark, the response in a region can be adjusted to flatten the output. HDR mode or regional FFC can compensate for this by applying a per-pixel based correction, providing the best result for a flat image. However, HDR limits the maximum line rate due to dual line acquisition and FFC requires greater than 2 seconds to load user set coefficients and cannot be used to adjust to changes in image regions in real-time. Alternatively, EOIs provide the maximum line rate but with a flattened image region.

AxCISカラーモデル
キャリブレーション手順
内容
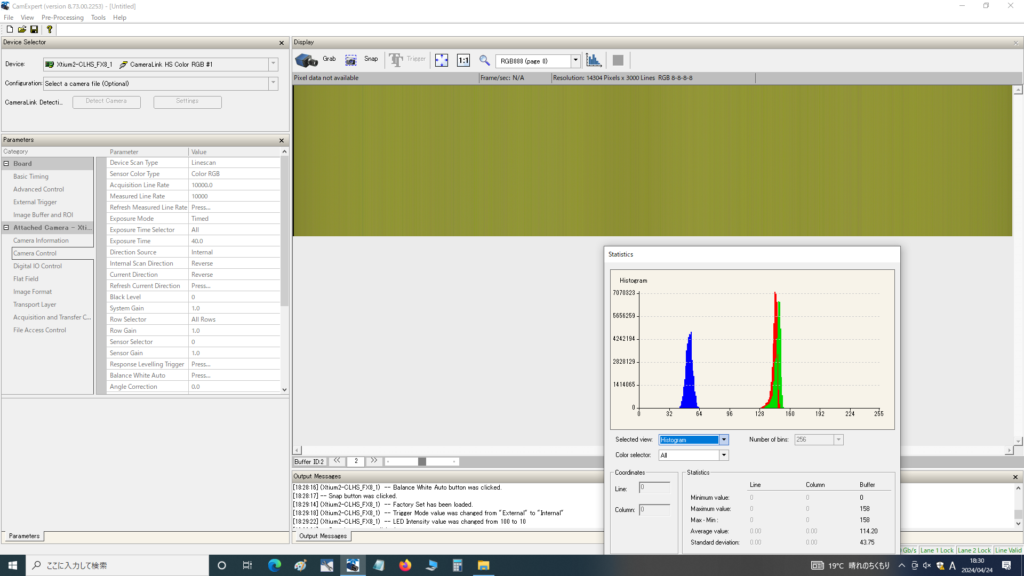
Bの輝度がRGより高い状態になる。
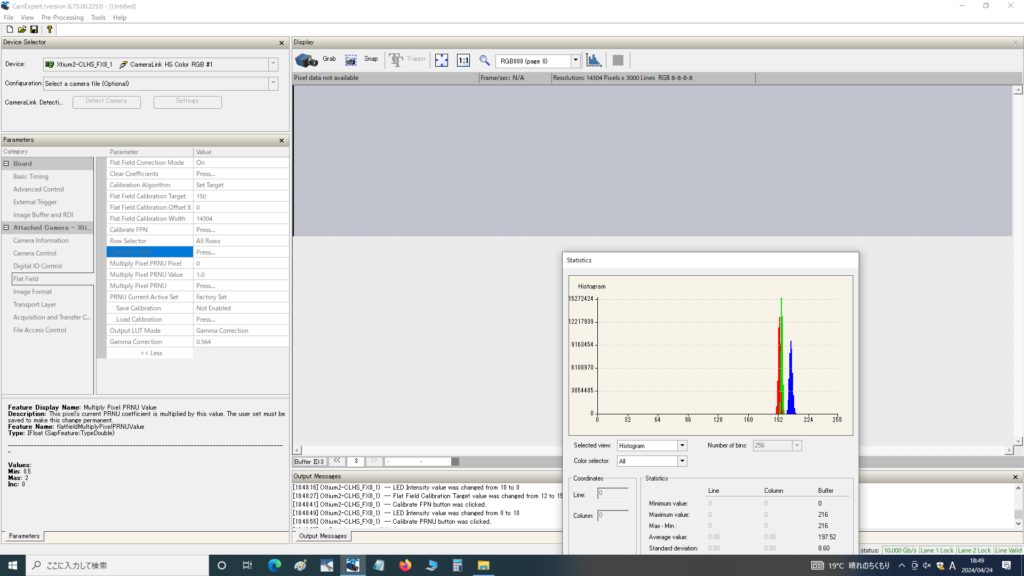
③Bの輝度を調整する PRNUターゲット値:143 Row selector:Blue Calibrate PRNU
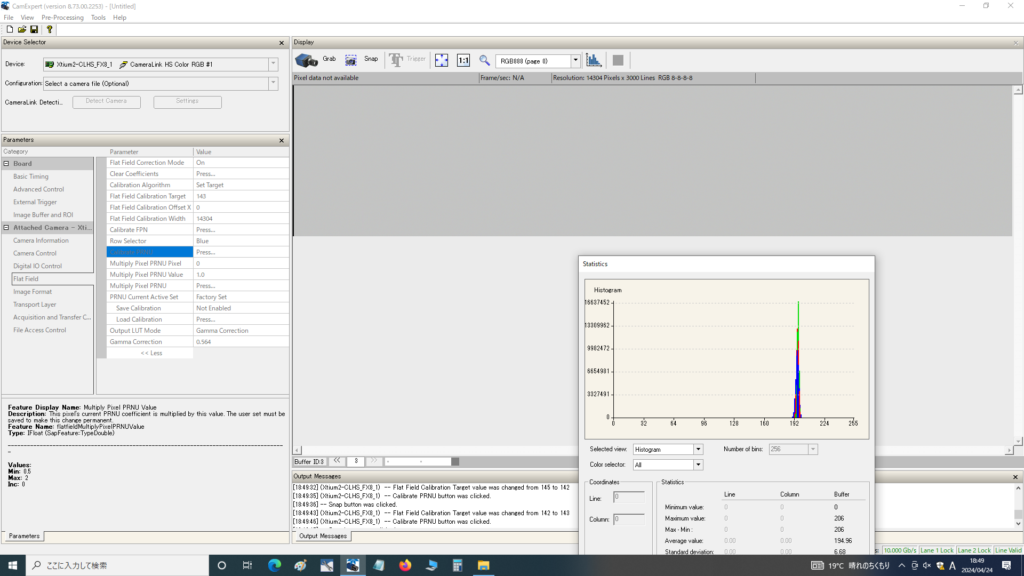
上記はあくまで例のため、環境に応じてヒストグラム等を見ながら調整する。
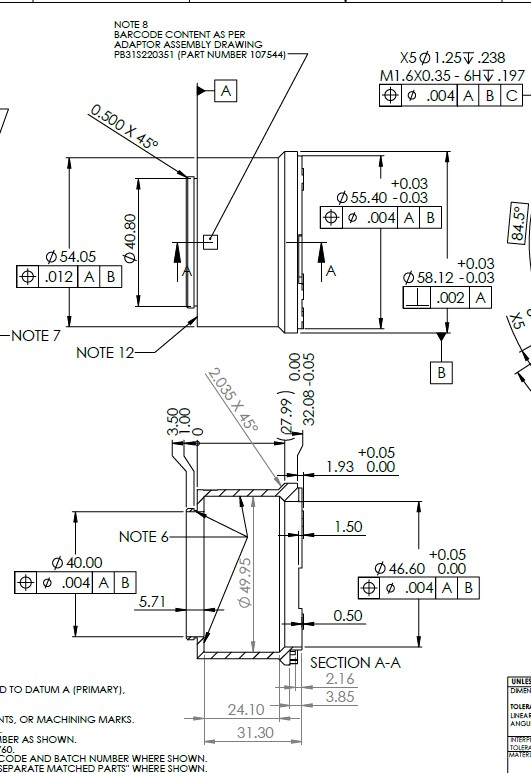
e2v社カメラ用Fマウントの
指令要件準拠(RoHS)
内容
<Fマウント図面に記載されておりましたRoHSについての質問> 部品:e2v社カメラ用Fマウント 型番:EV71KFPELIIXA-ABA 質問:図面上に 2011/65/EU の記載がありますがいかがでしょうか? 図面記載資料:図面上記載.jpg
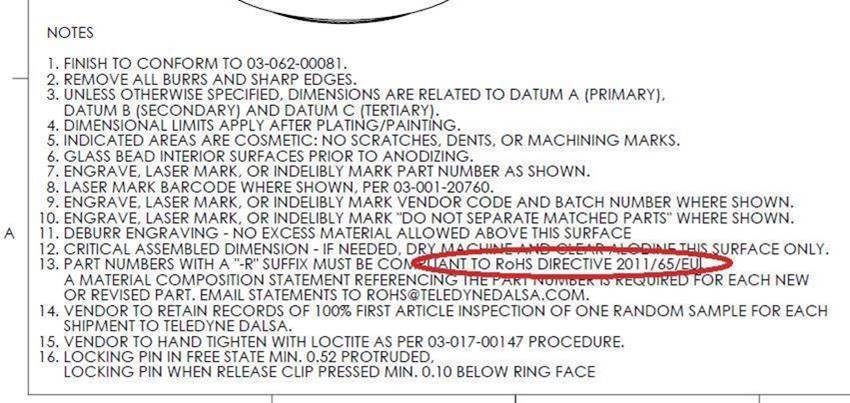
e2v社資料から下記の指令の要件に準拠していること確認いたしました。 資料:Declaration of Conformity RoHS -F-Mount_2023.pdf ・RoHS 指令 2011/65/EU ・WEEE 指令 2012/19/CE
Linea GigEとLinea Lite
_搭載機能の違い
内容
Per Line Metadataは Linea-GigE でサポートしており、 Linea-Liteではサポートしておりません。 Linea2-GigEではサポート予定です。
<Linea GigE(LA-GM)カメラマニュアル記載内容> Camera Specifications Overview Features Metadata Support : End-of-Line Metadata
Linea-GigEに比べ Linea-Liteでは、 その他判明しているもので、 Line Mirroing、Cycling Modeはサポートしておりません。
<機能内容> 機能:Meta Data(Per Line Metadata) ・情報を各ライン画像データの後にMetaDataが追加添付される形でカメラから出力されます。 ・各ライン毎に情報があるので、PerLineMetaDataと表現されております。
<カメラ別搭載機能> ①カメラ:Linea GigE(LA-GM) Meta Data機能:サポートしています。
②カメラ:Linea Lite Meta Data機能:サポートしていません。 ※Line Mirroing、Cycling Modeもサポートしていません。
※Linea2-GigEでは、Per Line Metadataをサポート予定。
ELiiXA+ CXPモデル メモ
内容
■Acquisition Start/Stop
・Acquisition Controlカテゴリをはじめとして、いくつかの(多くの)パラメータはAcquisiion Stopを行わなければ、値が反映されない
■TriggerRescalerGranularity
・表示値が変更できても、バックグラウンドでは反映されていない
・Granularityの値によってサンプル精度に影響がでる
・カメラマニュアル「ELiiXA+ 16k&8k Color CoaXPress user manual.pdf」(p.p.30-31)も参照
・プルダウンメニューも同様
・右クリックでRefresh操作を行っても、バックグラウンドの値や表示値は変わらない
・同様にUserset(またはFactory set) Load動作も、Acquisition Stop状態でなければパラメータは反映されない
■Multiplier/Divider
カメラ内部に分周・逓倍のレジスタを持つ
(Hirose5pinに直接エンコーダ信号を入力する場合使用)
・基本的にGranularityの値によってMultiplier/Devider が効かなくなるといったことはないが、
長周期の値に限度があため、入力信号の周期と設定によっては期待値の周波数が出なく動作しなくなる可能性はある
CamExpert_カメラ情報
_XMLファイルフォルダ
内容
1度カメラをCamExpertで立ち上げるとGenCPにしている場合は、 カメラからXMLの内容を読み込んでおります。 その読み込んだ内容はPC内に保存しております。 場所は隠しフォルダーの中で、
c:ProgramDataTeledyne DALSAGenICamDownload
こちらで、PXLやLineaのCLHSのXMLファイルの情報を得ることが可能です。
Linea Liteカメラの取込ライン数(Height)上限制限
内容
カメラ機種:L2-GM-04K02B-00-A (Linea Lite 4k GigE Mono) 仕様:Max Image Height(4k) 4068ライン (取込ライン数に制限) ※制限改善のご提案は<補足>をご確認ください。
< ご提案内容> ・7000ラインの画像取り込みと保存がしたい。 フレームトリガー1つにつき、取り込むフレーム数を2にして ユーザープログラム上でつなぎ合わせる処理を行って頂く方法。 MultiFrameTriggerを利用して、7000ラインを分割取り込み後、 画像処理ソフト側で2フレームを結合。
Falcon4 11M 高速撮像時のBuffer設定
内容
CamExpert上にて、高速撮像時、
デフォルトのBuffer:2だと、エラーが発生する (Buffer Incomplete)
リングバッファ処理が追いついていないものと思われる。
添付ファイル(資料タブをご確認)のようにBuffer数を増やすと現象が改善。
ELiiXA+ Full Exposure Control Mode
内容
「Full Exposure Control」機能の挙動について
(添付マニュアルp.p.32-34に記載有り)
一般的にTDIセンサは露光制御が出来ず、最大露光となります。
Full Exposure Control機能はTDI動作を唯一使用する4Sモードでも、 出力値を一定に保てるよう意図されたものです。
それぞれ、実際のLine Periodを「Tper」、 ユーザー設定のexposure timeを「Prog_Tint」とすると、
Tper = 4 x Max (10µs, Prog_Tint) + 10µs
のとき自動的に4S↔2Sに切り替ります。
また、4S→2S、2S→4SのSwitch Pointで、 2line白飛びや黒つぶれのような画像が出力されます。
この2lineの異常画像出力を避けるためには Image Fromat Control内のFull Exposure Control Modeの設定で、 下記の1または2を選択する必要が御座います。
“0” : Mode 4S/2S With all Lines at the Switch(2lineも出力する)
“1” : Mode 4S/2S Without incorrect Lines at the Switch(2lineを出力しない)
“2” : 4S Only
Linea-HS32Kカメラ_Super Resolution Mode仕様
内容
32K Super Resolution Mode では、binning及びAOIの設定は不可。
Linea-HS32Kカメラ_SuperResolution mode時のボード側設定内容
内容
LA-HM-32Kの超解像機能をサポートするには、Xtium2-CLHS PX8-HRを PCに搭載した時に Device ManagerのConfigurationにて 「Camera Link HS with HMTF」を選択して「Start Update」する必要がございます。 詳細は「資料」の情報をご確認ください。
図面
EV71-MOUNT-F図面
内容
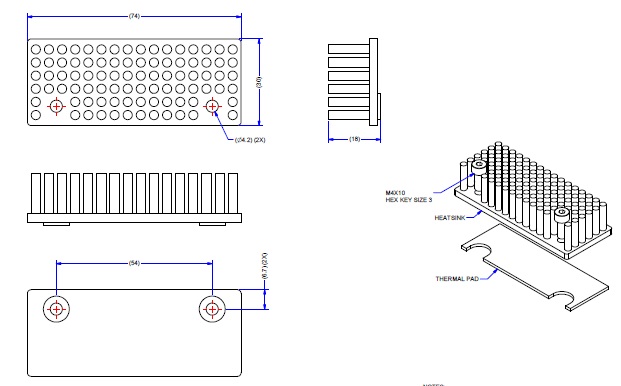
AC-MS-00115 図面
内容
Linea8k 、16k用 ヒートシンクの図面データです。
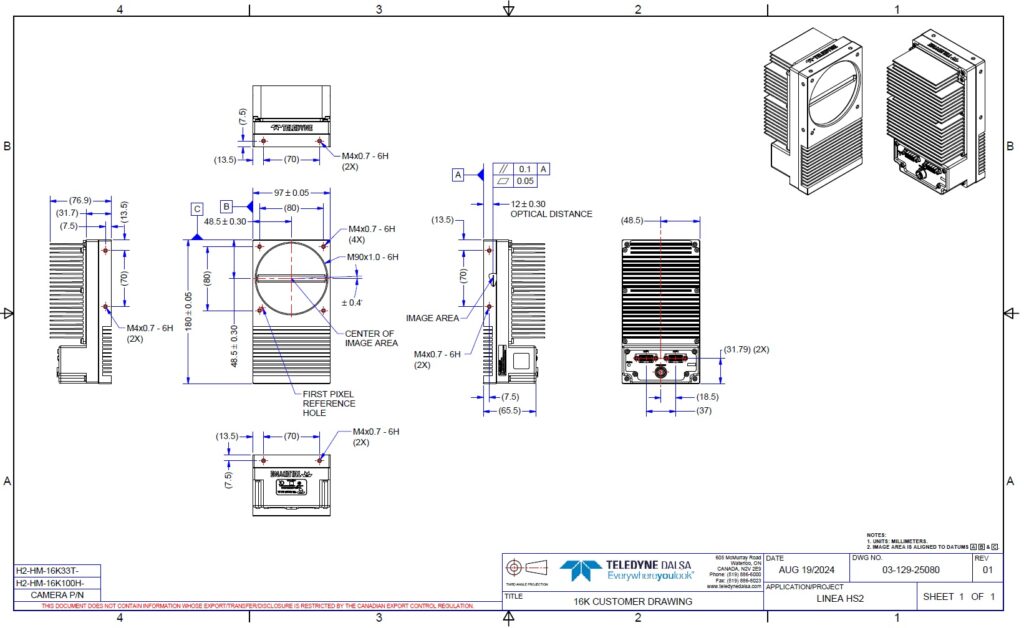
Linea HS2 16Kカメラ図面
内容
Linea HS2 図面
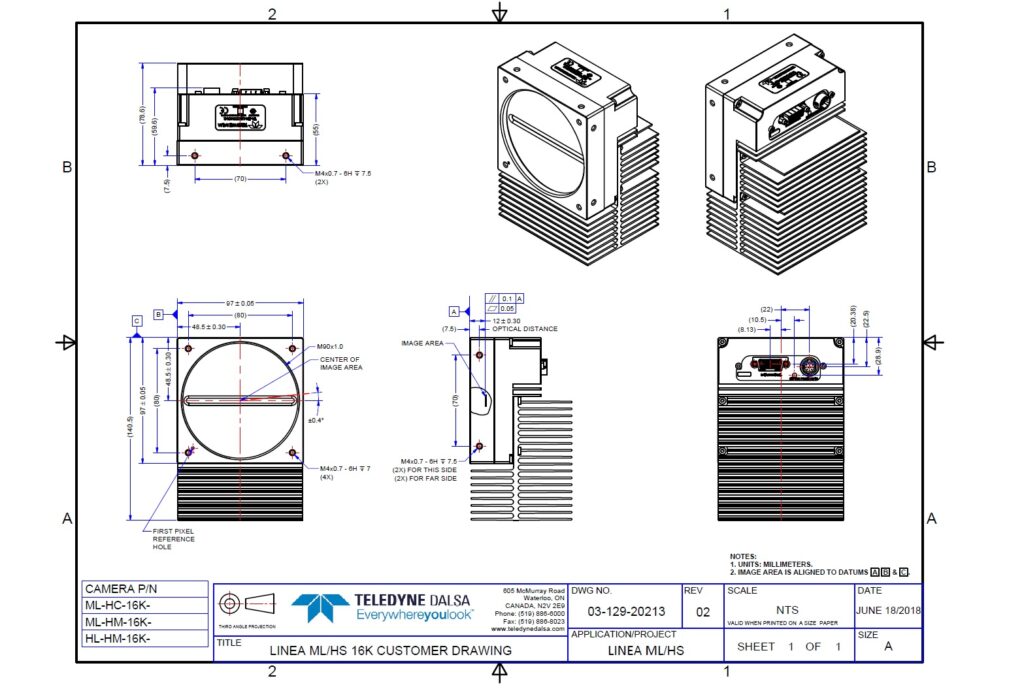
Linea HS 16Kカメラ 図面
内容
Linea HS 図面